1. Inspecting Fluid Levels
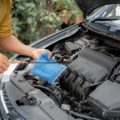
Before you hit the road or head back home, one of the most important steps in car maintenance is checking your vehicles fluid levels. Proper fluid levels keep your car running smoothly and help prevent unexpected breakdowns during your road trip adventure.
Why Fluid Levels Matter
Your vehicle relies on several essential fluids for optimal performance and safety. If any of these are low or dirty, it can lead to overheating, poor braking, engine trouble, or even total breakdown. Taking a few minutes to inspect and top off these fluids gives you peace of mind and helps ensure a safer journey.
Key Fluids to Check
| Fluid | Purpose | How to Check | When to Top Off |
|---|---|---|---|
| Engine Oil | Keeps engine parts lubricated and prevents overheating | Use the dipstick under the hood; oil should be between the “min” and “max” marks | If below the minimum mark or looks dark/dirty |
| Coolant (Antifreeze) | Regulates engine temperature and prevents freezing/overheating | Check reservoir level; look for markings on the side of the tank | If below recommended level or appears rusty/cloudy |
| Brake Fluid | Ensures responsive braking and safe stops | Inspect brake fluid reservoir; should be between “min” and “max” | If near or below minimum level; never ignore low brake fluid! |
| Transmission Fluid (for automatics) | Keeps transmission running smoothly and shifting gears properly | Some vehicles have a dipstick; consult your owners manual for instructions | If color is dark or smell is burnt, or if level is low (for vehicles with dipsticks) |
| Windshield Washer Fluid | Keeps windshield clean for clear visibility | Check washer fluid reservoir under hood; top off as needed | If reservoir is low or empty, especially before long trips |
Quick Tips for Checking Fluids Safely:
- Park on a level surface and let the engine cool down before checking most fluids.
- Use a clean rag to wipe dipsticks before reinserting them for an accurate reading.
- If youre unsure about any step, your owners manual offers specific guidance for your make and model.
- Packing extra fluids (like oil and washer fluid) in your trunk can be a lifesaver on long trips.
2. Tire Condition and Pressure
Before you hit the highway or head home from your adventure, checking your tires is a must for safe travels. This means looking at all four tires—and don’t forget about the spare! Here’s what you need to keep in mind to avoid flat tires or dangerous blowouts while on the road.
What to Check on Your Tires
- Inflation: Use a tire pressure gauge to make sure each tire is inflated to the recommended PSI (found in your car’s manual or on a sticker inside the driver’s door). Underinflated or overinflated tires can lead to poor gas mileage, uneven wear, and even tire failure.
- Tread Depth: Adequate tread helps grip the road, especially in wet conditions. You can use a penny—insert it into the tread with Lincoln’s head upside down. If you can see all of Lincoln’s head, it’s time for new tires.
- Visible Damage: Scan for cuts, cracks, bulges, or nails stuck in the tire. Any sign of damage could cause a problem during your trip.
Recommended Tire Pressure Chart
| Tire Position | Recommended PSI Range* |
|---|---|
| Front Tires | 32-35 PSI |
| Rear Tires | 32-35 PSI |
| Spare Tire | 60 PSI (compact spare) |
*Always check your owner’s manual for your vehicle’s exact specifications.
Keeping an eye on these simple things can help prevent unexpected stops and keep your journey stress-free. It only takes a few minutes but can save you hours of trouble down the road!
![]()
3. Testing the Battery and Electrical System
Before you hit the road for your big trip—or after youve just come back—its crucial to make sure your cars battery and electrical system are up to the task. A healthy battery and properly working electrical components help you avoid unexpected breakdowns and keep you safe, especially when driving long distances or at night.
Why Battery and Electrical Checks Matter
Your car’s battery powers everything from starting the engine to running your headlights, turn signals, and even charging your phone. If your battery is weak or the electrical system isn’t functioning right, you might end up stranded or facing costly repairs.
How to Check Your Battery and Electrical System
| What to Check | How to Do It | What to Look For |
|---|---|---|
| Battery Condition | Look for a date sticker (most batteries last 3-5 years), inspect for cracks or leaks. | No visible damage, not older than 5 years. |
| Battery Terminals | Inspect where the cables connect to the battery. | No corrosion (white or greenish residue), terminals are tight and clean. |
| Electrical Systems | Turn on headlights, brake lights, blinkers, hazard lights, interior dome light, and dashboard lights. | All lights work; no dimming, flickering, or failure. |
| Dashboard Warning Lights | When you start the car, check if any warning lights stay on. | No persistent warning lights related to the battery or electrical system. |
Simple Tips for a Healthy Battery and Electrical System
- If you notice slow engine cranking or dim lights, get your battery tested at an auto parts store—they often do it for free.
- If there’s corrosion on the terminals, disconnect the battery (negative cable first), clean with baking soda and water, dry thoroughly, then reconnect (positive cable first).
- Make sure all electrical accessories like GPS units or dash cams are unplugged when not in use to prevent unnecessary drain.
- If your car sits unused for long periods, consider a trickle charger to maintain battery health.
Quick Reminder:
A well-maintained battery and reliable electrical system mean fewer surprises on the road. Taking a few minutes for these checks can save you hours of hassle during your trip!
4. Brake Inspection
Making sure your brakes are in great shape is a must before and after any road trip. Whether you’re cruising down the highway or navigating stop-and-go city traffic, reliable brakes keep you, your passengers, and everyone else on the road safe. Here’s what to look for:
What Should Be Checked?
| Component | Why It Matters | What to Check |
|---|---|---|
| Brake Pads | Worn pads can reduce stopping power and damage other brake parts. | Check thickness; replace if less than 1/4 inch. |
| Brake Rotors | Warped or damaged rotors can cause vibration and poor braking. | Inspect for deep grooves, warping, or rust. |
| Brake Fluid | Low or dirty fluid can lead to spongy brakes or brake failure. | Check fluid level and color; top off or flush if needed. |
How Often Should You Inspect Your Brakes?
- Before a Trip: Always have your brakes checked if you haven’t done so in the last few months or if you notice unusual noises or reduced performance.
- After a Trip: Long drives, especially through mountains or with lots of stopping, can wear down your brakes faster. Get them checked again when you return home.
Signs Your Brakes Need Attention
- Squeaking, grinding, or squealing sounds when braking
- A “soft” or spongy feeling when pressing the pedal
- The car pulls to one side when braking
- The brake warning light appears on your dashboard
A Quick Tip:
If you’re not comfortable checking your own brakes, most auto shops in the U.S. offer free brake inspections—just call ahead and ask! Having peace of mind about your vehicle’s ability to stop quickly and safely makes every trip more enjoyable.
5. Post-Trip Evaluation
Once your road trip is over, its important to give your car a thorough check to make sure it handled the journey well and is ready for your daily drives. Long hours on the road can put extra stress on various parts of your vehicle, so taking some time to inspect it will help keep you safe and avoid unexpected repairs later.
What to Check After Your Road Trip
| Component | What to Look For | Why It Matters |
|---|---|---|
| Tires | Check for unusual wear, low tread, or any punctures. | Worn or damaged tires can be dangerous and reduce fuel efficiency. |
| Fluids | Look under the car for leaks and check all fluid levels (oil, coolant, brake fluid). | Leaking or low fluids can lead to engine damage or unsafe driving conditions. |
| Brakes | Listen for squeaking or grinding noises and pay attention to how the brakes feel. | Worn brakes affect stopping distance and overall safety. |
| Lights & Signals | Test headlights, brake lights, turn signals, and hazard lights. | Proper lighting is essential for visibility and legal compliance. |
| Windshield & Wipers | Inspect for cracks, chips, or worn wiper blades. | Clear vision is key for safe driving in all weather conditions. |
| Batteries & Cables | Check for corrosion or loose connections around the battery terminals. | A healthy battery ensures your car starts reliably every time. |
| Exterior & Undercarriage | Look for dents, scratches, or debris caught underneath the vehicle. | This helps prevent rust or further damage that could become costly. |
Address Issues Promptly
If you notice anything unusual during your inspection—like strange noises, warning lights on your dashboard, or visible leaks—dont wait to get these checked out by a trusted mechanic. Taking care of small problems right away can save you from bigger headaches down the road and ensure your car remains reliable for everyday use and future adventures.
Quick Tip:
If youre not comfortable doing these checks yourself, many local auto shops offer post-trip inspections. Its an easy way to get peace of mind after a long journey!